
Dev From Scratch: 2/n
Effective AI-assisted development using only local resources

Chapter 2 of "development from scratch", where we build a competitive and highly effective AI-assisted coding environment using only local models and resources.
This chapter covers proper setup of a WSL distro for the series.
Link to previous chapter | Link to next chapter | Link to companion GitHub repo
Windows Subsystem for Linux (WSL)
We’re setting up a linux-based environment for this guide because most modern cloud deployment targets are ARM or linux-based x64. WSL uses GPU Paravirtualization (GPU-PV), whereas your production B200 and/or NVL72 nodes use PCIe passthrough (DDA) via AWS Nitro, GCP Titan, or Azure Boost. GPU-PV incurs a relative performance penalty but, for the purposes of our guide, it is negligible.
Host Setup
Enable WSL on Windows
# PowerShell Admin
wsl --install
Install Ubuntu LTS (”Long Term Support”: use in prod unless building from Alpine).
# PowerShell Admin
wsl --install -d Ubuntu-24.04 --name Yevai --web-download
Download and install VSC (Visual Studio Code - Link)
Use this knowledge to connect to WSL with VSC.
Everything else in this guide, unless otherwise explicitly indicated, will be done in WSL.
WSL Setup
Assume all commands to be ran, unless otherwise explicitly indicated, in $HOME (~) of the active WSL user. You will see “$HOME” used instead of ~. This is best practice for many reasons we’ll skip in this guide. For example, in some target environments like AWS Lambda, you will need to override $HOME to enable libraries to use the /tmp/ ephemeral FS layer cache. $HOME and ~/ do not always interact the way one would expect.
Update OS components and compensate for the fact that we are in WSL
sudo apt update
sudo apt upgrade

# Install WSL utilities
sudo apt install wslu
I have mixed feelings about Homebrew but it makes this guide much easier.
# Install Homebrew
/bin/bash -c "$(curl -fsSL https://raw.githubusercontent.com/Homebrew/install/HEAD/install.sh)"

# Activate it in the current shell
eval "$(/home/linuxbrew/.linuxbrew/bin/brew shellenv)"

# Install the Github CLI, ZSH, PL10K, and JQ.
# Several LM-based coding tools benefit from PL10K!
brew install gh zsh powerlevel10k jq
Shell setup - feel free to skip if you have your own preferences. The guide will rely on this specific setup. Checking out the companion repository is non-optional.
# Allow ZSH and set it as default
command -v zsh | sudo tee -a /etc/shells
chsh -s $(which zsh)

# Install OhMyZSH
sh -c "$(wget https://raw.githubusercontent.com/ohmyzsh/ohmyzsh/master/tools/install.sh -O -)"

# Install and go to ~/Git. $_ gets the argument of the previous command.
mkdir "$HOME/Git" && cd $_

# Log into GitHub ("open" works thanks to wslu). Don't use tokens unless you have no choice.
gh auth login

# Confirm you're logged in
gh auth status

# Set the global git config - doing so from the active GH CLI is best practice.
# Note: this is especially useful when automating in CI with service accounts.
git config --global user.name "$(gh api user --jq '.name')"
git config --global user.email "$(gh api user/emails --jq '.[] | select(.primary) | .email')"

# Confirm your git username and email
echo "$(git config --global --list)" | grep user

# Clone the companion repository and go to it.
gh repo clone https://github.com/yev-ai/personal-yev-substack && cd personal-yev-substack

# Git aliases are useful, especially for rebases / merges / automation.
git config --global alias.root "rev-parse --show-toplevel"

# This now shows the folder of the git repository you're in.
git root

# Mount ZSH and PL10K configs - this also serves to confirm our paths.
chmod +x "$(git root)/docs/001_wsl_setup/setup.sh"
"$(git root)/docs/001_wsl_setup/setup.sh"

# Export the Git Root directory into our pre-zsh hook. This is where you checked out the repo.
echo "export GIT_ROOT=\"$(dirname "$(git root)")\"" >> "$HOME/.zshrc-pre.sh"

# Source the new ZSHRC
source "$HOME/.zshrc"

# Make sure our GIT_ROOT is set correctly - we'll use this heavily in later sections:
echo "$GIT_ROOT"
Confirm GPU Virtualization
If your host and WSL are set up correctly, including the latest drivers, this should be available in WSL:
nvidia-smiYou should see output similar to:
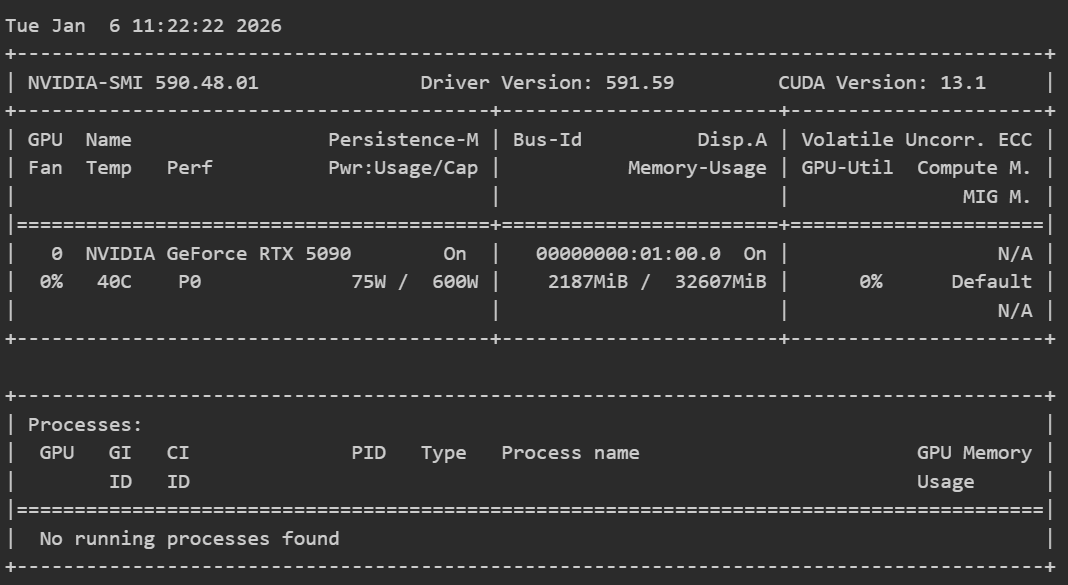
The windows host OS reserves around ~2GB VRAM. This guide will gracefully work around lack of exclusive GPU control which we normally have in cloud nodes.
Confirm Memory Allocation
# Install a basic resource monitor for WSL
brew install htop

# Run it
htop
You should see output similar to this:
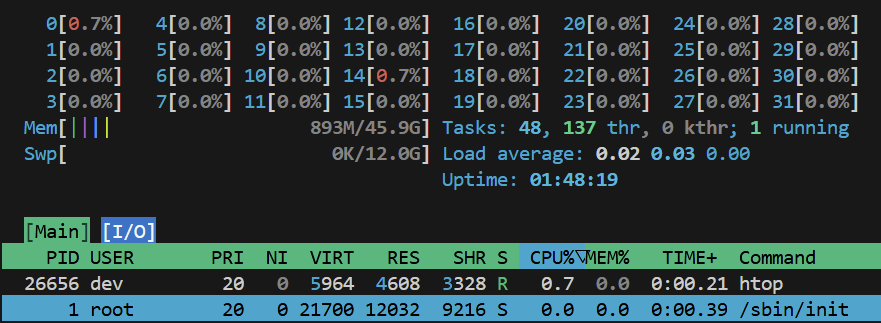
Only 50% of our host’s 96GB RAM is available to WSL under “Mem”, along with a 12GB swap file. This will become important later.