ML: A Networking Perspective, Pt1/X
Part 1! This series is designed for SWEs. No DevOps experience required.

In “ML: A Hardware Perspective”, we outlined a cross-cloud infra setup. Feedback was:
That’s too much. Most companies are LangChain and API bolt-ons.
How do we actually set something like this up? Need DevOps help.
This will be a series aimed at addressing both of these things. We’ll set up a global cloud-agnostic backbone with persistent connections between each cloud provider.
This article sets the groundwork for the series with a short action item at the end.
Who This Is For
Startups working on “AI” - API calls, bolt-ons, frameworks like LangChain.
Startups working on ML - training, inference, fine-tuning, self-hosted.
You don’t have a Platform team or their skill ceiling is not the best.
Benefits
Quickly and safely capitalize on all 3 clouds’ advantages in every cloud:
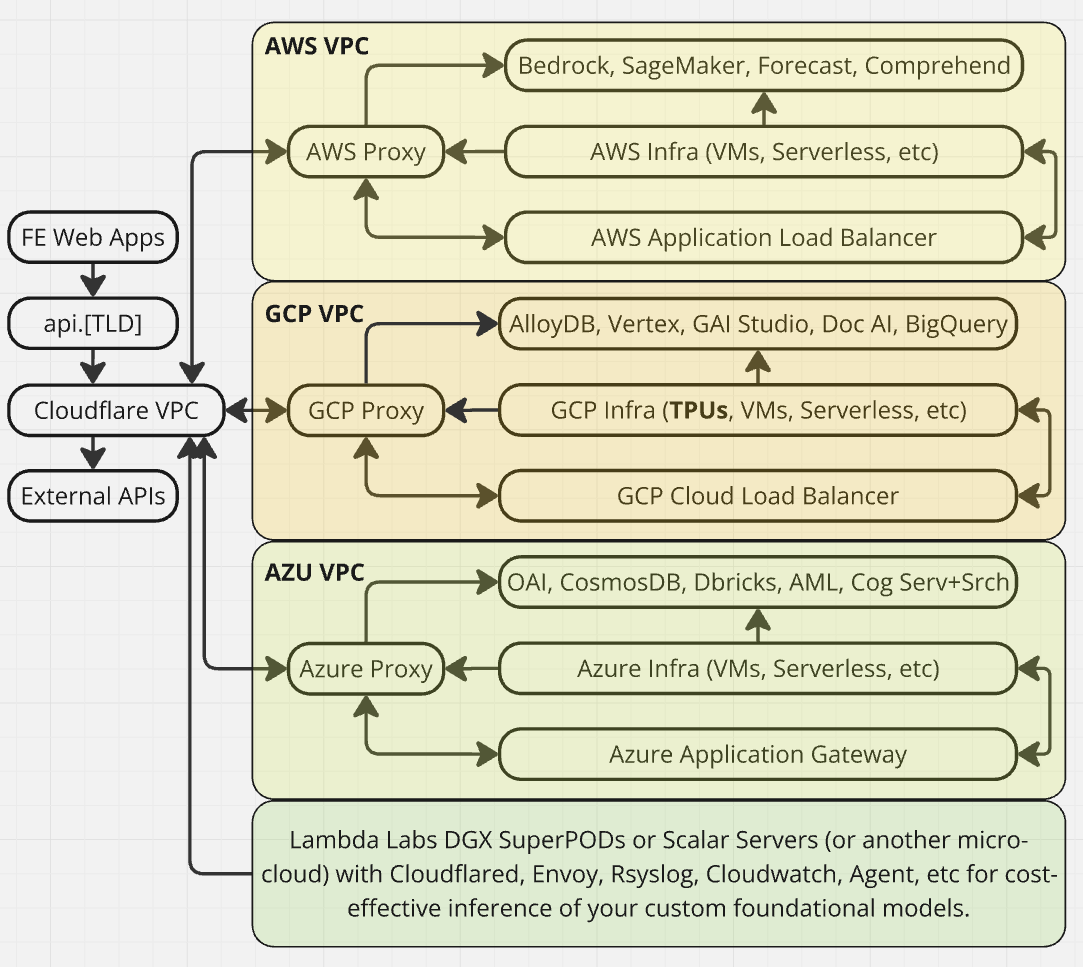
Use GCP’s AlloyDB, Vertex, GAI Studio, Doc AI, BigQuery, etc in AWS/AZU.
Use Azure’s OAI, CosmosDB, Dbricks, AML, Cog Serv+Srch, etc in AWS/GCP.
Use AWS’s Bedrock, SageMaker, Forecast, Comprehend, etc in GCP/AZU.
Vastly reduce latency and jitter for most of your external vendor API calls.
Set up inference endpoints with Lambda Labs’ DGX SuperPods or Scalars.
Security. Easier IAM/SG/etc management, no more exposing ingress, etc.
Your future DevOps team will say good things to you AND about you.
Unified cross-cloud analytics, image optimization, global ingress backbone.
Plus better performance than you’d have with (and save you the monthly charges of) AWS Global Accelerator ($18/mo each), Azure Front Door ($35/mo each), and GCP Premium Tier networking - plus the rather steep bandwidth costs for all of those. A lot more bells and whistles come with this setup but we’ll dig into those in later articles.
Drawbacks
It’s one more place where things can go wrong. This setup is reliable and I’ve used it for many companies, but things CAN go wrong. We will cover DR and redundancy to mitigate that. It’ll cost extra but will still be over 10x cheaper than peering at baseline.
What Are We Doing?
In this series, we’ll implement the diagram below. This involves swapping DNS to Cloudflare and adopting a bit of Pulumi in your infra. I’ve built out MLOps/DevOps infra for dozens of companies, and not a single one has regretted doing either.
I’m not going to bore you with too many of the networking details but here’s the gist:

We’ll go with envoy for management APIs and a few other specific capabilities. Our design goals (ordered): Cost, Security, Maintainability, Performance, and Robustness.
This will be built in a specific way that allows us to easily add Disaster Recovery, Fault Tolerance, Durability, and an Istio control plane for practical management later on.
Alternatives
VPC Peering
The downside to this is cost. Below is one of the most basic peering solutions you can have and the total of the below prices along with Edge Routers ($200-300/mo/cloud) and Monitoring Tools ($100-200/mo) would be at least ~$2,736-3,436 per month.
AWS ↔ GCP
AWS Direct Connect Port: $262/mo 1Gbps, GCP Partner Interconnect: $151/mo 1Gbps, Cross-Connect: $200-300/mo, Subtotal: $613-713/mo
AWS ↔ Azure
AWS Direct Connect Port: $262/mo 1Gbps, Azure ExpressRoute Circuit: $305/mo 1Gbps, Cross-Connect: $200-300/mo , Subtotal: $767-867/mo
GCP ↔ Azure
GCP Partner Interconnect: $151/mo 1Gbps, Azure ExpressRoute Circuit: $305/mo 1Gbps, Cross-Connect: $200-300/mo, Subtotal: $656-756/mo
WireGuard: Advantages
WireGuard is a VPN protocol designed for simplicity and high-performance encrypted networking. Cloudflare Warp (what we’ll be using) is based on the WireGuard but saves us from dealing with things like WG key and configuration management!
Extreme Performance: Minimal latency and negligible CPU overhead.
Simplicity and Transparency: Easy-to-understand config, fewer security risks.
Cost Efficiency: Free and open-source software (FOSS); only server costs.
Fully Self-Managed: Complete control over security, routing, keys, and privacy.
WireGuard: Disadvantages
Manual Key & Configuration Management: You have to manually handle cryptographic keys, configurations, updates, deployments, and other stuff.
Infrastructure Management Required: Self-hosted infra is more complex.
No Built-in Firewall or Security Policies: it's just a VPN layer.
TailScale: Advantages
Tailscale is built on WireGuard and similar to Cloudflare Warp, but with an automatic mesh that simplifies key distribution and network setup. In our case, TailScale could be 1-3ms faster but it is a direct P2P solution that exposes external IPs, suffers from public network transit jitter, and doesn’t backbone us to external API vendors.
Zero-Configuration Setup: TailScale is to WireGuard what Istio is to Envoy. It handles WireGuard keys, peer discovery, configuration, and other handy stuff.
Automatic NAT Traversal and Mesh Routing: Direct peer-to-peer connections even behind NAT are great for warm, low latency, and distributed deployments.
Strong Security Defaults: Strong auth via Single Sign-On (SSO) integration.
TailScale: Disadvantages
Dependence on Tailscale Infrastructure: Relies on Tailscale’s control plane.
Limited Customization: Cannot fully customize encryption, auth, or keys.
Compliance & Privacy Considerations: Central control plane.
Nebula: Advantages
Nebula is a scalable mesh networking platform developed by Slack. It gives us a secure overlay network and handles dynamic node discovery (kind of like Istio).
Scalable & Secure by Design: Uses certificate-based authentication (PKI), scales well from 10 to 1000+ nodes. This is extreme overkill in scale and complexity.
Rich Security Features: Built-in SGs and firewall-like policies give good control.
Robust NAT Traversal: Traverses firewalls and NAT for hybrid and multi-cloud.
Open-Source: Highly customizable, transparent, and fully self-hostable.
Proven in Prod: Heavily battle-tested by Slack in large prod environments.
Nebula: Disadvantages
Complexity: Initial setup requires PKI certificates and custom configuration files.
Self-Managed Infra: Similar to WireGuard, we deal with more self-managed infra.
Operational Overhead of Key Management (PKI): Things can go really wrong.
ZeroTier: Advantages
ZeroTier is software-defined networking (SDN) for cross-cloud virtual Ethernet.
Simplicity & Rapid Deployment: Very user-friendly with a web GUI.
Automatic NAT and Firewall Traversal: This saves a lot of headache.
SDN Capabilities: Routing, bridging, and network segmentation out of the box.
Hosting Options: ZeroTier’s control plane can be cloud-hosted or self-hosted.
ZeroTier: Disadvantages
Centralized Control Plane (by Default): they’re not as big as CloudFlare.
Performance Tradeoffs (Layer-2 Ethernet Emulation): Slightly higher latency due to Layer-2 tunneling overhead versus Layer-3 VPNs (WireGuard/Tailscale).
Enterprise Scale Costs: can scale quickly and brutally at enterprise levels.
Complexity at Large Scales: Virtual Ethernet networks are complex in large multi-cloud environments, especially with network loops, multicast, and broadcast.
What Are We Doing In This Post?
In this post we’ll figure out where to put our proxies in each VPC for them to be as physically close to each other as possible. Networking 101 for the Big 3 Clouds:
Region = a geographically wide group of interconnected Availability Zones.
Availability Zone (AZ) = a physical group of data centers in a Region.
Virtual Private Cloud (VPC) = logically isolated network spanning all AZs in a Region.
Subnet = a network segment inside a VPC with its own CIDR IP address range.

The relationship between Subnets and AZs is not the same in AWS, GCP, and Azure.
GCP
A Subnet spans all AZs in a Region by default. Specifying an AZ during creation of a VM guarantees it will be in a specific physical location. Example: us-east4-a, -b, or -c.
Azure
A Subnet also spans all AZs in a Region by default. Specifying an AZ during creation of a VM guarantees it will be in a specific physical location. Example: “eastus” and “1”.
AWS
A Subnet is tied to a specific AZ at creation but the mapping of AZs (“us-east-1a”, “us-east-1b”) to physical locations is randomized per-AWS-account at creation.
In a per-tenant AWS account setup (which you should have, security 101), you need to reverse-map AZs for each account. This is done by spinning up public IP EC2 instances in each account and latency testing between them. Example: if the latency from a VM in “us-east-1a” for AWS Account “Foo” to “us-east-1c” for AWS Account “Bar” is <2ms consistently, you can safely conclude that they are in the same physical location.
Let’s Do The Thing!
We’ll use PBK to find the lowest latency VM combination between the following AZs:
GCP us-east4-a, us-east4-b, and us-east4-c.
Azure eastus 1, eastus 2, and eastus 3.
AWS us-east-1a, us-east-1b, us-east-1c, us-east-1d, us-east-1e, and us-east-1f
I prepared some code to do this and wrote the guide for it here. In our case, they are:
AWS us-east-1a
GCP us-east4-a
Azure eastus-1
In the next article we’ll set up a proxy in each cloud provider that responds to a simple health check endpoint. We’ll then use WRK and Autocannon to do a few performance tests with and without features like Smart Routing. These will be externally mapped:
api.[TLD]/api/v5 → Proxy in AWS VPC
api.[TLD]/api/v6 → Proxy in GCP VPC
api.[TLD]/api/v7 → Proxy in Azure VPC
VPC-to-VPC communication will be handled later on in a secure and performant way.