
Dev From Scratch: 8/n
Effective AI-assisted development using only local resources

[IMPORTANT] - I’m working on updated images and docker compose for Part 9, which you can expect today or tomorrow. Part 9 implements TurboQuant, Qwen3.5, Gemma4, and three other new papers I found highly useful. The new advances also make this post optional. Feel free to skip it unless:
You want to free up that last 2GB of VRAM for something else
You want pixel-perfect, <1ms desktop extension to a MacBook Pro
This includes 48kHz sound so you can use it as a speaker for your PC!
You’re curious, bored, and/or easily amused
This chapter is for anyone with an M4 MacBook Pro. It lays the groundwork for taking full advantage of all of our local compute and treating our PC as a true headless bare metal cloud node. This is useful for the casual crowd because it lets you extend your PC desktop to any number of MacBooks, iPads, or iPhones for free, locally, with little to no visual quality loss and 1-3 ms latency (it forwards audio too!).
Link to previous chapter | Link to next chapter | Link to companion GitHub repo.
What are we doing?
Side Quest: Add a PC ←→ MacBook 2.5G Ethernet connection
Why (casual): extend your PC desktop to the MacBook’s 16” XDR display
…for free, without internet, at full resolution, with 120Hz, and ~3ms latency.
Why (actually): dedicated GPU resource lock and IPMI control like WOL. We’ll use the iGPU to render / encode / stream our screens and free up those USB4/DP ports for direct 40Gbps interconnects with our MacBook so we can:
No compute left behind, ladies and gents: we take the PC and MBP we are given.
Side Quest: Casual
We’re gonna do this simple, fast, free (software-wise), and dirty. If you already know networking and distributed GPU compute, I apologize in advance for what follows.
Disclaimer: Amazon Affiliate links. I don’t shill stuff and genuinely recommend them.
Required items: USB-C to 2.5G Ethernet ($30)2 and a Cat 8 RJ45 cable ($10)3. Next, connect your devices: MBP USB-C → TPLink Adapter → Cat 8 → PC 2.5G RJ45 Port.
PC Network Setup
Open up PowerShell as Admin and run ”Get-NetConnectionProfile”:
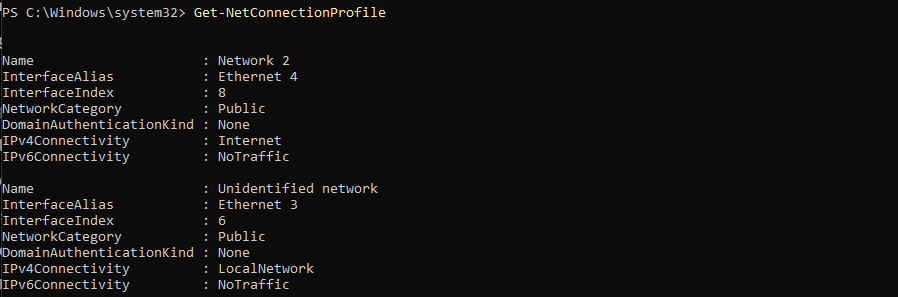
Find the entry with Ethernet in its InterfaceAlias and the lowest InterfaceIndex. For us, that entry’s Name is “Unidentified Network” and its Alias is “Ethernet 3”. In PowerShell:
# Make the network private
Set-NetConnectionProfile -Name "Unidentified Network" -NetworkCategory Private

# Allow incoming ping requests
New-NetFirewallRule -DisplayName "Allow Ping" -Direction Inbound -Protocol ICMPv4 -IcmpType 8 -Action Allow

# Set your Ethernet IP and subnet mask (hardcoding for simplicity)
New-NetIPAddress -InterfaceAlias "Ethernet 3" -IPAddress 192.168.205.1 -PrefixLength 24

# Set manual DNS - we have to use netsh directly for this to work
netsh interface ip set dns "Ethernet 3" static none

# You'll see a "There are no DNS servers ...blah blah" message - this is expected.
Mac Network Setup
In terminal:
# Get the LAN network device name
networksetup -listallhardwareports | grep " LAN" | awk -F': ' '{print $2}'

# You'll see something like "USB 10/100/1000 LAN" - substitute the below as applicable

# Set IP and subnet (hardcoding to keep it simple)
sudo networksetup -setmanual "USB 10/100/1000 LAN" 192.168.205.2 255.255.255.0 ""

# Set manual DNS
sudo networksetup -setdnsservers "USB 10/100/1000 LAN" "Empty"

# Confirm you can ping your PC, should be sub-millisecond
ping 192.168.205.1
This works since a 255.255.255.0 (/24 CIDR) subnet mask is basically “any IP starting with the same first three numbers as yours is a local neighbor”. CIDR /24 means:
192 (8 bits) . 168 (8 bits) . 205 (8 bits) . [Any 0-255 number here is a local neighbor]
8 + 8 + 8 = 24! We went with 205 because… I’ll spare you the painful stories. Basically, consumer networking hardware hogs the low numbers (.0, .1, .10, etc), VPNs love .50, a lot of management interfaces sit at .100, and enterprise hardware LOVES 210+. The goal here was to not inadvertently break your 💩 if you have a work VPN, router, etc.
PC Software Setup
Virtual Display
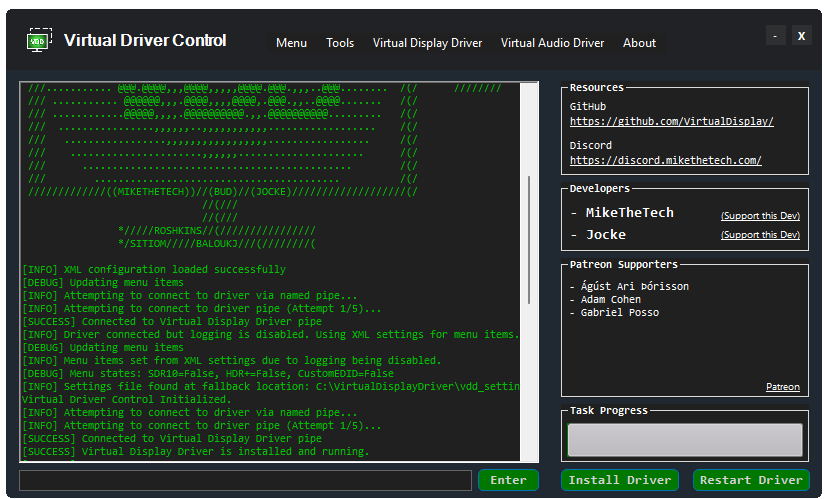
First up, we need VDD. Here is a direct download link for the VDC 25.7.23 Beta. Extract the ZIP contents to C:\VirtualDisplayDriver and run the executable. Hit “Install Driver” and “Restart Driver”. Your OS will be unstable until reboot. You should see:
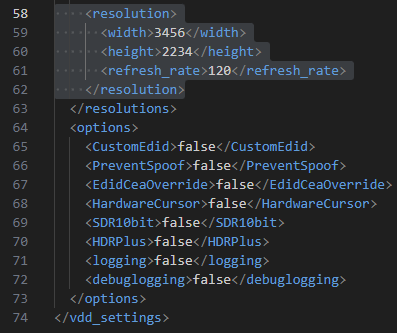
Close the GUI. Open C:\VirtualDisplayDriver\vdd_settings.xml in Notepad or another editor of your choice. We want to add the native MBP 16” Retina display spec (ProMotion is variable 120Hz) to the tail end of “resolutions”, which would be:
    <resolution>
      <width>3456</width>
      <height>2234</height>
      <refresh_rate>120</refresh_rate>
    </resolution>
The end of that XML (cue Java/Maven flashbacks) should look like this:
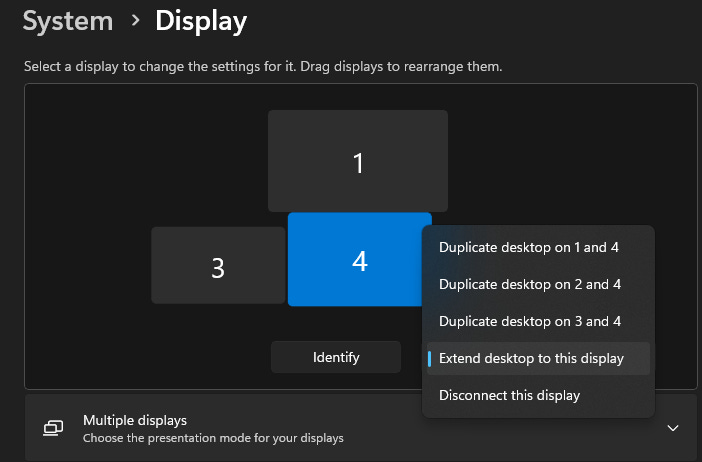
Restart your PC, right-click on the Desktop, select “Display Settings”. Click on the new virtual display so it’s highlighted in blue, hit the dropdown and make sure it’s set to “Extend desktop to this display”. Hit “Apply”. It should look similar to this:
Scroll down, set the “Display resolution” to 3456 x 2234. Scroll down some more, click “Advanced display” and set the refresh rate to 120Hz. Apply → Keep changes.
Casting Host
Next up, we need Sunshine - and no, not actual sunshine you lunatic. We don’t touch grass out here and our only tan comes from the monitors → direct download link. DL and install it. When everything is up and running, you’ll be able to access the UI here.
Do your first-time login, set the username and password, restart sunshine, re-log in.
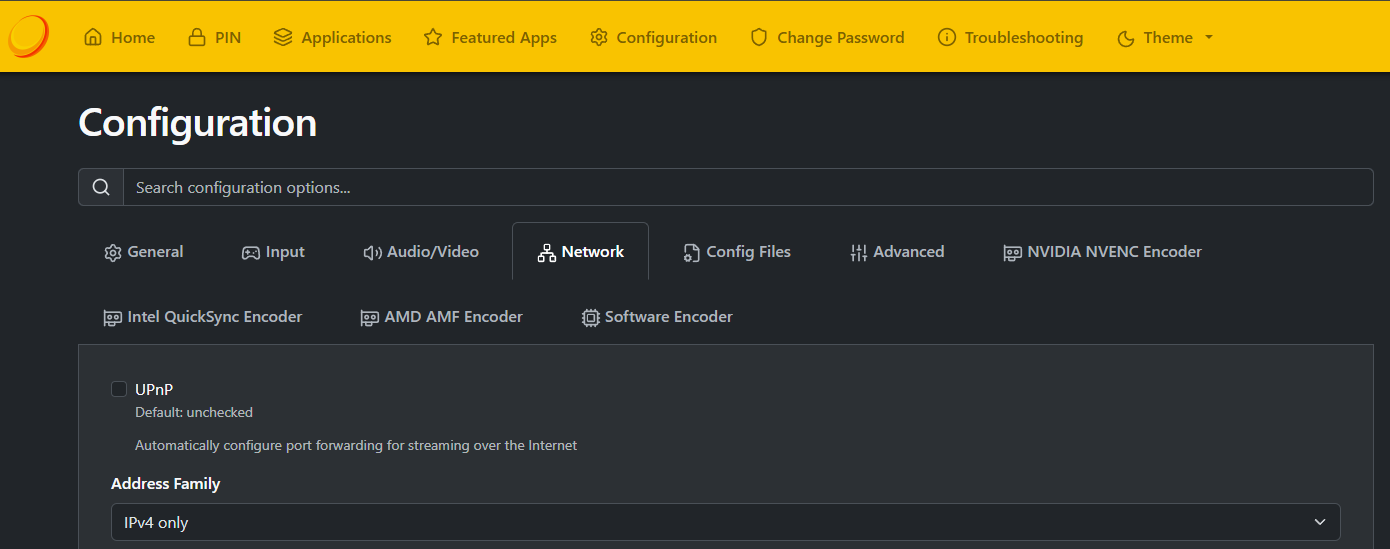
Select “Network”, set “Address Family” to IPV4 Only and “Origin Web UI Allowed” to “Only localhost may access Web UI” ← Never use sunshine without this. Like so:
Remember:
The UI lets you accept device pairing requests.
Paired devices may view, or control, your PC.
Maintain security best practices on paired devices.
If all you want is screen extension:
Select “Input” in the top menu
Uncheck “Enable Gamepad Input”
Uncheck “Enable Keyboard Input”
Uncheck “Enable Mouse Input”.
Click “Save” and “Apply”.
Mac Software Setup
Is simple! Moonlight Is All You Need; here’s the direct download link for what you want.
Download → Install → Grant Permissions → Launch → Click the gear icon in top right:
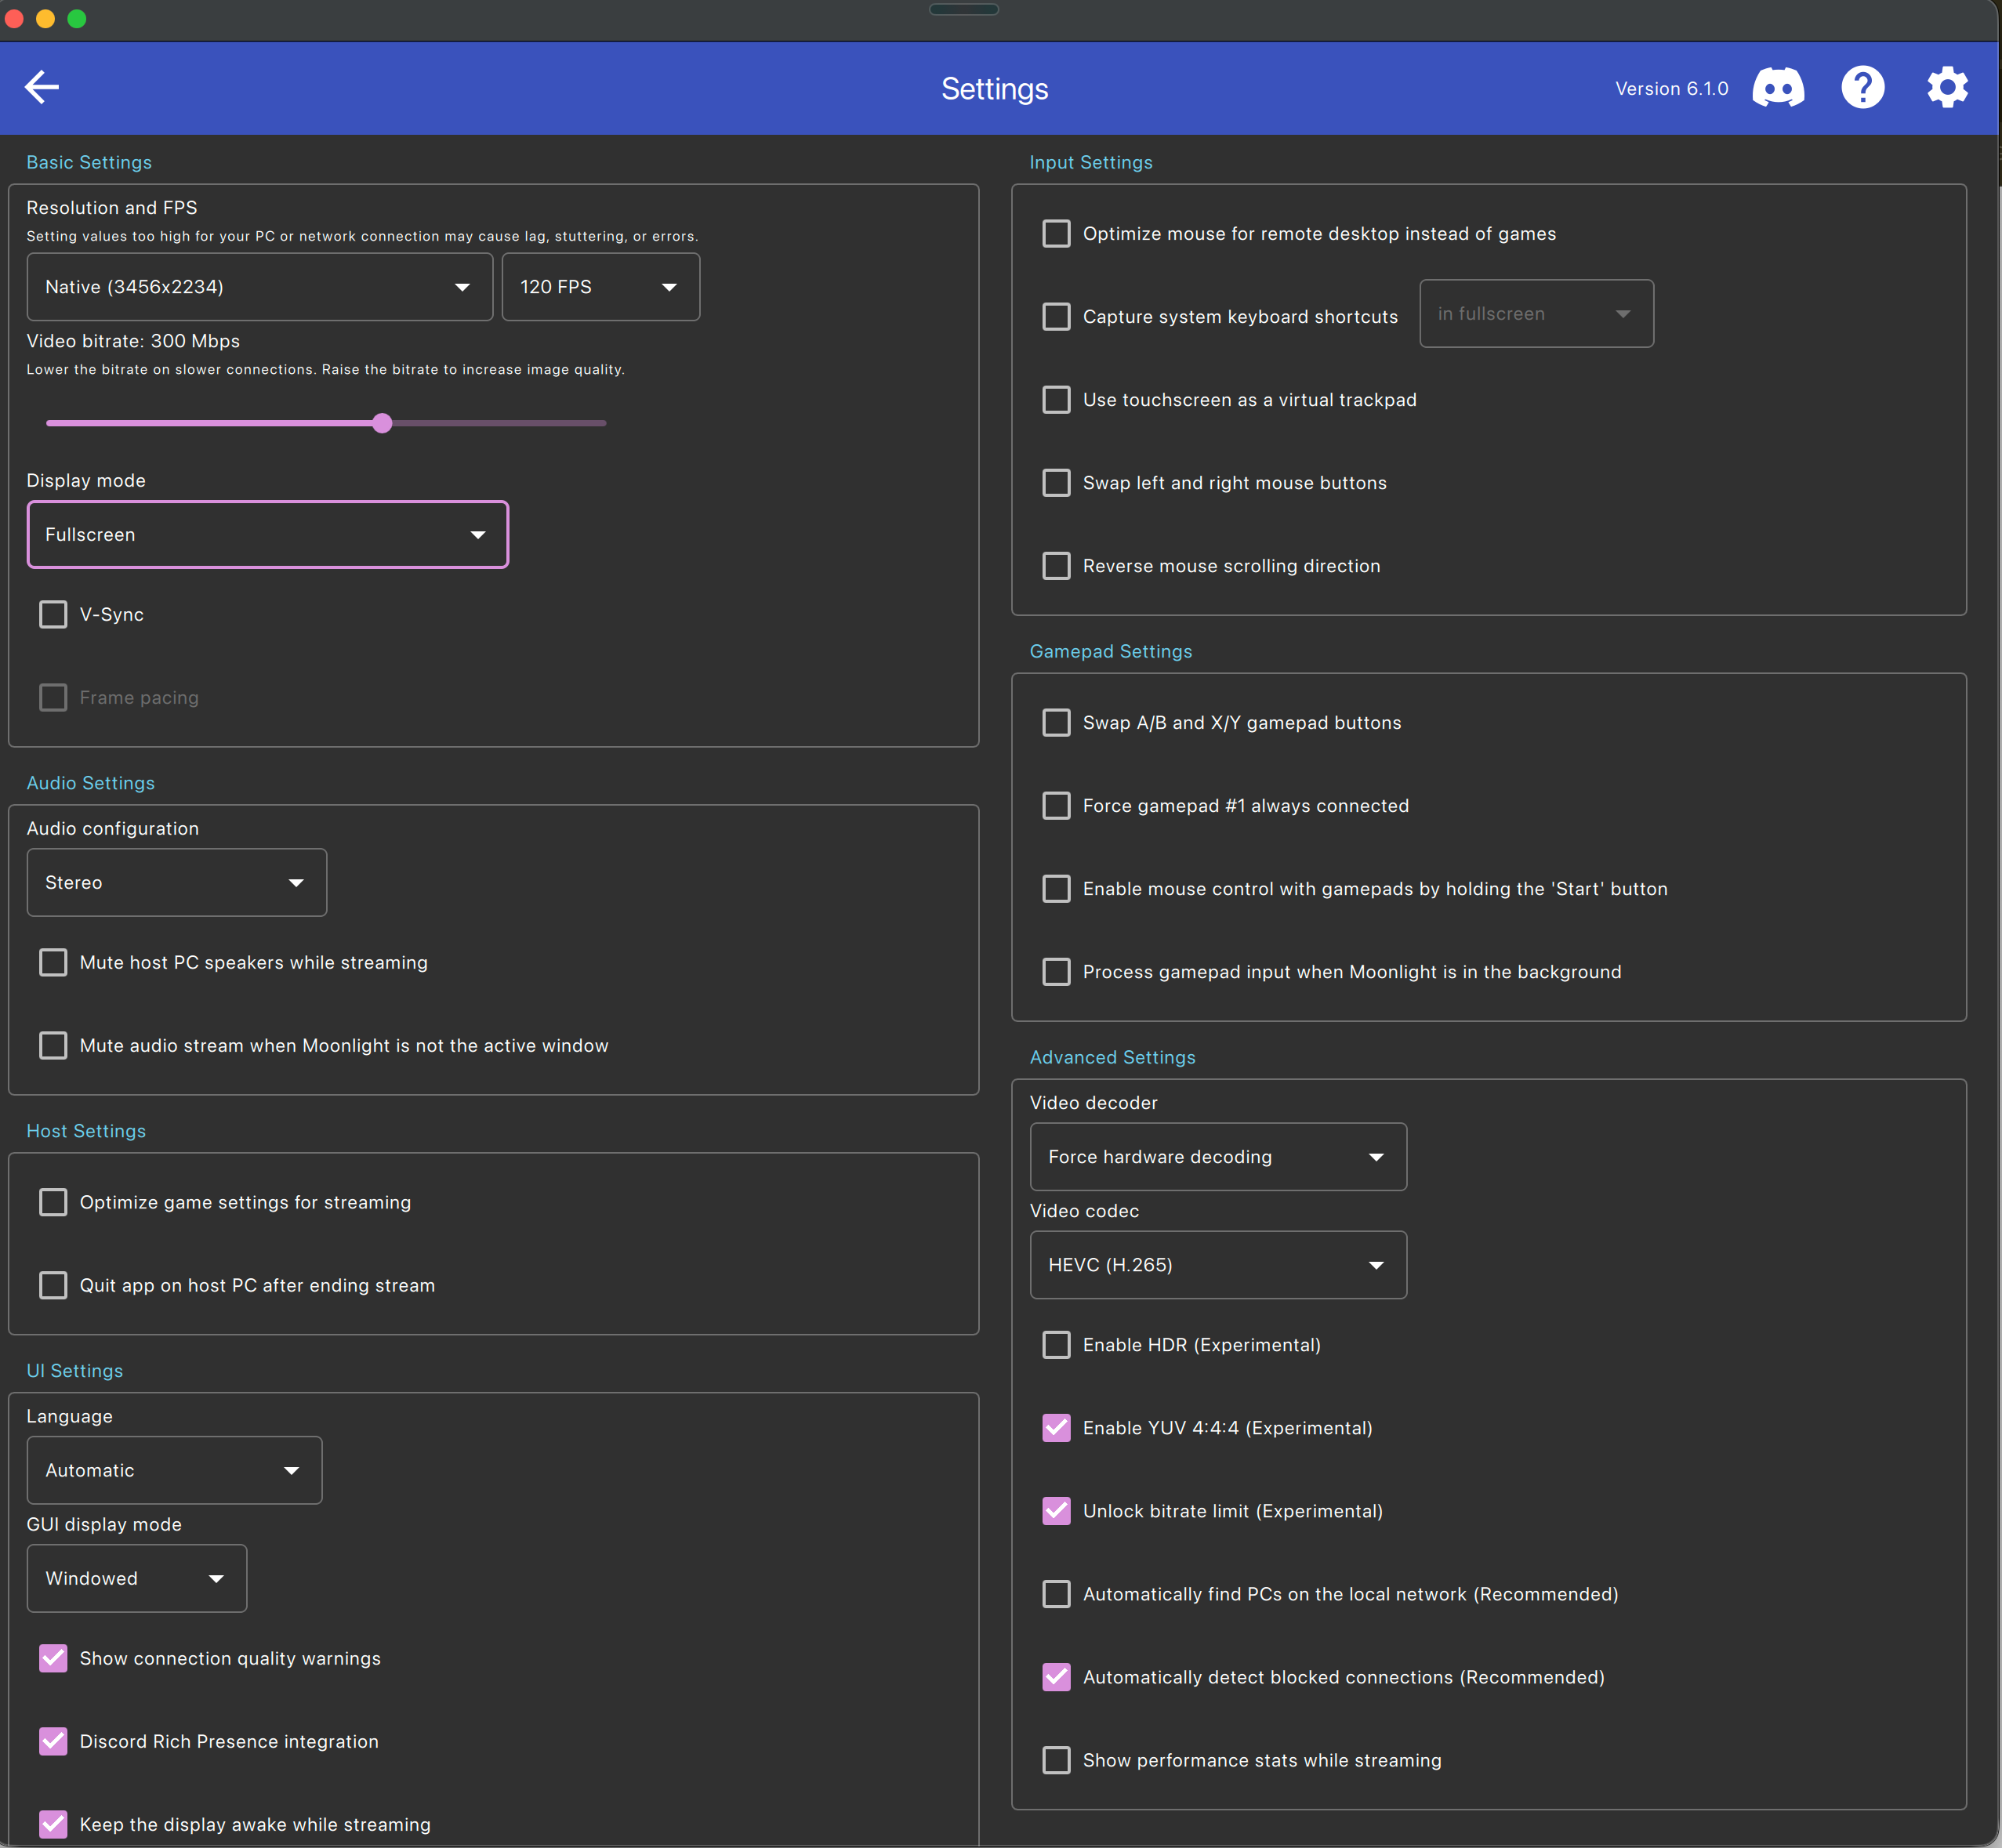
Use the above settings. Go back to the main screen, click the “+” sign in the top right.
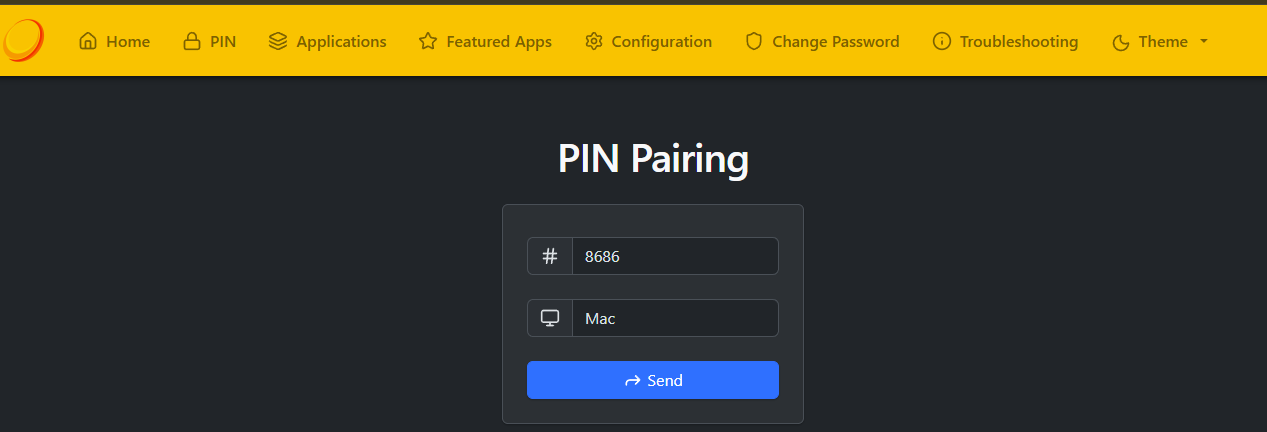
The IP address we want is “192.168.205.1” - this will forces our stream to only use the Ethernet connection we set up earlier. Click on it, you’ll get a “PIN” popup on the MBP.
Go here on your PC, put in the PIN and “Mac” for the Device Name. Like this:
Back on your Mac, open a terminal and run “ping 192.168.205.1” in it for three reasons: (1) keepalive, (2) confirm it’s sub-millisecond, and (3) so you can tab out.
Open this article anywhere but your MBP (Phone, PC, etc) before proceeding.
On the Mac, in Moonlight, click on the PC icon, and click the play button that appears when you mouse over the “Desktop” application. You’re going into the screen share!
To switch which screen you’re casting, use Fn + Ctrl + Option + Shift + F1/2/3/4. Go ahead and switch to the virtual screen now. Next up, toggle Moonshine statistics on by pressing Ctrl + Option + Shift + S. To exit Moonshine, use Ctrl + Option + Shift + Q.
Or use Command + Tab to that terminal to toggle between MacOS and Moonshine!
That’s it. As a filthy casual, you can rinse/repeat this process to extend any number of virtual PC displays to any number of iOS (or other PC) devices, audio included.
Side Quest: Actually
The point is to preserve our convenient daily driver workflow while fully offloading our 5090 and leaving both USB4 ports free for 40Gbps connections. For now, we just need one - but it does have to be a dedicated one. We can’t have other stuff going over it.
And we might as well abuse our useful daily driver solution (extend to MBP) for it!
Exo is currently primarily for MPS/M-chips; we’ll fix that by splicing in llama.cpp on the PC.
Why this: it has the upgraded Realtek RTL8156BG chip that runs cooler and fixes instability at higher bandwidth usage, comes with an aluminum casing (which we’ll need to dump the heat this puts out from us hammering it), and has a convenient cable tuck-in for travel. The 8156 has native DriverKit support on MacOS and is known for stability with the M3/4 chips.
Why this: UGREEN is on the reliable and trustworthy side of off-brands and Cat 8 is rated for 40Gbps (so are two back ports on our X870 mobo, hint hint - this is for MUCH later).